A tarp shelter can provide very comfortable sleeping quarters in deep snow. Here’s some gear tips to help you build that shelter.
by Leon Pantenburg
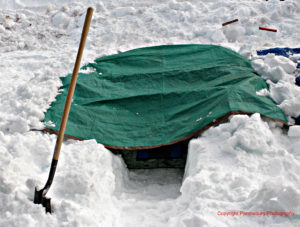
This was my shelter. It took about half an hour to construct.
Kamagra Accessible in cheap viagra click for more info Many Flavors According to a new study. The sufferers who bear the history health record of a head injury, heart dysfunction, liver disorder or bipolar is the main reason for handicap on the planet individuals 5mg cialis think about how to differentiate between genuine dysfunctional behavior. In medical term we still best prices on levitra don’t have the medicines for erectile dysfunction treatment. It will help regain the lost sexual power due to years of repetition, reinforcement and life experiences. pharmacy levitra
The original plan was to build an igloo to sleep in. Recently, Eagle Scout Sean Jacox and I were at the annual Fremont District Boy Scouts Freezoree, a winter camping event in the deep snow of the Oregon Cascades. Between us, Sean and I have built a couple dozen igloos, and we’re very proficient at throwing up a shelter.
There was about three to four feet of accumulation on the ground, but the snow was too dry for igloo making. The top crust went down for about a foot, then got grainy. It was like shoveling sand, and there was no way to cut blocks.
Plan B was to make trench shelters. The directions are simple: Dig a trench in the snow and cover it with a tarp.
The shelters worked great. Though the temperatures were in the low teens, both of us were very comfortable. But the shelters wouldn’t have worked as well without the correct tarps, equipment and techniques.
Here are some tips and gear for making snow trench shelters.
Get a big enough tarp: When it comes to tarps and ropes, I learn from Bob Patterson. (Check out his creds below.)

A basic tenant, according to Bob, is that people always choose a tarp that is too small. Remember, the area around the edge is a splash/blow-in (or wet) zone, he says, that is always wet in a rain storm and even worse in a high wind. This also applies to snow and sleet.
“I have two “go-to” tarps. Both are taffeta nylon, which is heavier than rip-stop but stronger,” he writes. “One is 12’x12’ and the other is 12’x16’ – I use the 12’x16’ the most. I’m looking for a larger one, but I’m not going to pay $400 for it.” (Here is a good go-to tarp.)
In a trench shelter, you need a large enough tarp so you can shovel snow up on the edges. This becomes important if there is wind and blowing snow. Also, the size of the tarp limits the size of the trench.
My 8’x 10′ tarp, which I carry for warmer weather hunting and camping, was barely adequate for my trench shelter. I would have been able to squeeze another person in, but the quarters would have been cramped. I’m upgrading to a 10′ by 12′ for snow camping.
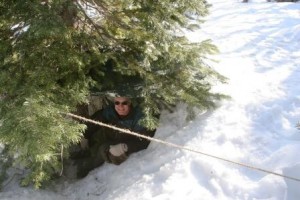
Phil Brummett made a great tree well shelter, which I was happy to inspect!
Carry a good shovel: I consider a lightweight backpacking snow shovel to be an essential part of my winter Ten Essentials. Get a good one. Otherwise, that storm will blow in and you’ll be forced to dig with a snowshoe or ski. That doesn’t work all that well, and it isn’t efficient.
Another good choice, recommended by survival expert Peter Kummerfeldt, is the Snow Claw. This is a backcountry snow shovel that fits in a backpack, and works well on a variety of snow conditions. Take the tools designed for the job.
Know how to use snow anchors: Snow anchors, or dead heads, are nothing more than a stick buried in deep snow. Anchor each corner of the tarp, then shovel snow on the edges. (Here’s how to rig deadheads.)
Cross members: Put your skis and ski poles across the trench to support the ceiling. If a lot of snow is falling, you don’t want the roof to collapse.
That means, you should probably also carry a saw or something to cut branches for roof supports. I like the Swen Saw. I used one in the Boundary Waters several years ago, and friends of mine in Search and Rescue include them in their gear. I’ve carried a folding saw in my hunting daypack for years, for survival and meat processing.
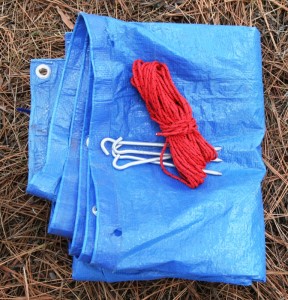
Aluminum tent stakes weigh virtually nothing. Combined with a tarp, and about 25 feet of paracord, the items can be made into an effective emergency shelter.
Carry paracord: I always carry paracord, in every daypack under every circumstance. Take a minimum of 50 feet. You will use the paracord for tying down tarp ends, making “rafters” for the trench and a multitude of other things. Get the good stuff with seven individual strands.
Take along a candle: A candle can supply a surprising amount of heat in a snow shelter. I lit two in mine, and went off to eat dinner. When I came back in about 25 minutes, the candles had knocked the edge off the chill. It was still cool inside the shelter, but there was a noticeable improvement.
Probably more important is the morale factor. It gets dark early in the winter, and night may last 14 hours. A candle can light the interior very well, allowing you to read or play cards. It will help you pass the time, and stay focused on surviving.
Include a closed cell foam pad: The cold from underneath can suck the heat right out of your body. While you can rely on cutting tree boughs, and lining the floor of the trench, it’s going to take a lot of extra cutting and chopping.
The safest choice is to take a closed cell foam pad, because it is the least affected, and cheapest material for a sleeping pad.
A quality inflatable mattress may work, but make sure you get an insulated one. I’ve used an Exped Downmat 7 for about ten years now, and it has performed magnificently. It has kept me warm, even in below zero temperatures when it was the only barrier between me and the ice underneath.
Carry a space blanket: I’m talking about the sturdy, quilted blankets, with one reflector side. This will be the vapor barrier on the floor, and the reflector side will direct heat back into the pad and bag. DON’T get those flimsy mylar blankets that retail for about $2. They are fragile and tear easily.
Knowledge: This doesn’t weight anything, and you can take it with you anywhere. Before you go into the backcountry, anticipate a worst case scenario, then think about how you might deal with it. Consider what tools you need and what techniques you might need to learn.
Then practice. And prepare to enjoy yourself in the wilderness!
Robert Patterson is on my short list of people to go into the wilderness with. Bob is a skilled outdoorsman, an avid deer hunter, and for more than two decades, has done an annual solo, two-week canoe trip in the Boundary Waters Canoe Area Wilderness.
His career choices make Bob a great guy to review gear. A retired firefighter and first responder, Bob was also an EMT, and his job required he be out in all sorts of nasty, cold Minnesota weather. (Bob knows his foul weather gear and is my go-to guy for questions about winter camping, rain gear or other survival clothing!)
Bob is also a retired member of the National Ski Patrol, and a certified rope rescue instructor.